Whatever reasons you may have for uploading video content on the internet, you are most likely considering uploading videos on the most popular video platform YouTube. Why not? Everyone has the YouTube app on their smartphone, and it is the second-biggest search engine there is! YouTube is easily the best way to engage an international audience while building brand recognition for individuals, businesses, or any entity wanting exposure.
Here’s everything you need to make your own YouTube video:
Step 1: Ask Yourself: What Types of Videos Are You Making for Your YouTube Channel?
Step 2: Making Your YouTube Video Script
Step 3: Make Your Video: YouTube Production
Step 5: Uploading Your YouTube Video
Step 6: Optimizing Your Video for YouTube
Why Choose YouTube?
- It is FREE! It is quite wonderful that the most popular video platform is free. Where else to upload video content?
- The Whole World is Your Audience! Create a YouTube video and YouTube’s 2 billion-plus logged-in users are immediately your audience!
- Its Simplicity is Refreshing. YouTube is very user-friendly. Make a video, upload, and your content will be there for the world to see.
- Upload All You Want. You have no limit to the number of videos you can upload!
Step 1: Ask Yourself: What Types of Videos Are You Making for Your YouTube Channel?

Knowing what kinds of videos there are to make will give you an easier time. These will give you a template for what to produce. Here is a list of what YouTube users follow the most:
A Video Series
A string of videos that feature a specific subject hosted by one or a rotation of hosts. These videos are usually around 10 to 18 minutes long and feature a plethora of mainstream to niche interests. YouTube users find these videos to be their connection to the community of their interests, hobbies, or sentiments.
Tutorial Videos
Also known as How-To Videos, YouTube users heavily rely on search results showing How-To videos for their everyday questions. They range from “How to Fix a Broken Bike” to “How to Find Your Life Partner.”
Reviews or Testimonials
I’m sure you have searched YouTube for a review of a product or service before deciding to avail of it or not. Well, that is also what 56% of people do before buying a product. Making reviews or testimonial videos will garner you a considerable following if you stick to making these kinds of videos.
Vlogs
Video logs of people about their travels, personal thoughts, or experiences. Hosts or vloggers present to you a topic through their personal views and opinions. People love hearing what others have to say especially if the vlogger has a unique way of presenting his life through their videos.
Gaming Videos
Videos where gamers post video content of them playing a certain game. Gaming videos are either a gameplay review, a live streaming of a competitive round of gaming, or a competitive tournament of a video game. These types of videos are among the most popular videos in the world and are part of the aggressive global E-sports scene. Get in on this type of online videos and reap the benefits their billions of viewers can give.
Educational Videos
These videos usually contain an informative presentation of facts that people can learn from. The best Educational videos are brief and prioritize learning as its main goal. They are also presented in an enthusiastic style to retain their viewers’ interest.
Comedy or Skit Videos
Everybody loves a good laugh, and an abundance of comedy videos are present to help us have a wholesome good time. Videos of this sort are usually comical presentations of jokes, sketches, and silly song and dance. These are the most viewed kind of videos because all of us love a good laugh every day.
Haul Videos
Now a staple in beauty, fashion, and lifestyle channels Haul videos usually show a YouTuber featuring makeup, clothes, or home décor products they purchased on a shopping spree. These videos showcase new products and current trends.
Q&A Videos
These videos feature YouTubers picking out and answering questions commented in by their viewers. This sort of interaction makes their viewers feel special and included. YouTube channels that do Q&A videos are rewarded with a huge following because of this degree of personal engagement.
Unboxing Videos
These bank on our universal love for unboxing something we just bought. Naturally, we find it amusing to watch others take a new item out of its box. These feature a YouTuber’s initial reaction and allow us to vicariously experience their excitement in seeing an item for the first time. This new cultural phenomenon garners a sizable following that brands use the appeal of the unboxing videos to promote and market their products or services.
| Pro Tip: Keep a list of video ideas you want to accomplish. Here’s some more good YouTube ideas.
Step 2: Making Your YouTube Video Script

Now that you are decided on what topic and what kind of video you are presenting your video as, you should now make your script. The script is a skeleton outline of what goes on in your YouTube video. A script will also help you stay on track and make it easier to retain your viewers’ interest.
A practical tip is to have a template for a script complete with parts and what these parts contain. Here is a general structure that you can follow for making a YouTube script:
Hook – The very beginning of the video that tells viewers what they are going to learn or what they will gain from watching your video. Viewers who understand your hook will likely stick around and finish watching your YouTube video.
- Be creative, yet brief.
- Retain their attention for more than a couple of minutes and they are more likely to watch until the end of your video.
- Don’t be afraid to use and memorize a word-for-word introduction for your hook. Practice delivering your hook for maximum effect.
Content – Is all about presenting everything you have to say and show in your video. This contains the meat and potatoes, so to speak.
Bonus – Value-added content where you over-deliver. Something short and sharp that will leave your viewers delighted because they feel like they have gotten more than what they came for. This also gives viewers an additional reason to finish watching your video.
Call to Action – Here is the part where you tell your viewers what you want them to do. An example is telling them to like, share, and subscribe to your YouTube channel if they enjoyed watching your video, or telling your viewers to follow links in the description below.
There are a lot of tutorial videos on how to make a script for your YouTube videos. Here are some very helpful examples:
How to Write a Script for a YouTube Video (Made Easy!)
How to Make a GOOD YouTube Video (SIMPLE Video Script Structure!)
Step 3: Make Your Video: YouTube Production
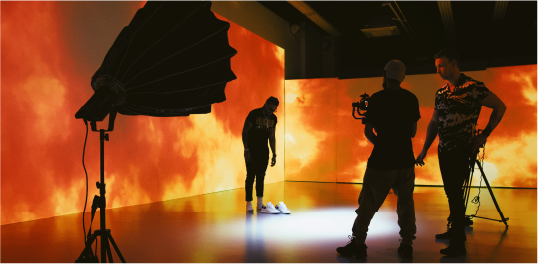
YouTube is one of the bigger faces of media today. The video platform has now become a giant in its own right that it is now greatly outpacing more traditional forms like print, TV, and radio. Knowing this, you as a YouTube content creator should be aware that you are now also your own producer. Like a producer for more traditional media, you must thoroughly know how to properly run your channel.
Keep in mind though, that with YouTube, just starting is more important than being perfect! Online videos are more forgiving and learning as you go will get you to where you want to be as long as you prioritize immediately starting your YouTube account.
As a producer, it is a must that you know or at least endeavor to learn all the steps necessary to produce your YouTube videos. There are 3 stages in any production:
Pre-Production or Pre-Prod
Pre-Production or Pre-Prod are all necessary steps to complete before the actual shoot, before the cameras roll, including planning, scripting, etc.
- Do an ocular inspection on your location for your shoot.
- Set construction, wardrobe, makeup, and prop preparation.
- Script finalization.
- Read-through of the script with talents and crew.
Production
Production is the actual shooting, recording, or filming. The point of no return!
- Master Lighting your set.
- Mount all your cameras. A shaky shot is an ugly shot, unless that is what you are going for.
Post-Production or Post-Prod
Post-Production or Post-Prod is editing, adding effects, graphics, and doing everything else needed to come up with the uploadable master video copy.
- Editing all video footage
- Editing soundtrack; adding music, sound effects, folly, etc.
- Adding graphics, titles, bumpers, opening and closing billboards, etc.
- Color correction and exposure equalization for a more even, professional look.
- Shooting additional scenes as needed.
Slowly master all these and watch your success grow.
| Pro Tip: Once you begin to post videos, next learn how to get more subscribers on YouTube.
Your Equipment
Below is the ideal arsenal of production gear you can have as a YouTube producer. Not having all these will not mean that you will not have high-quality video uploads. What is important is that you maximize what you have, trust your instincts, and always strive to bring out the best of what your equipment can bring.
- Camera Setup and Mounts – Use a combination of the following:
- 4K Mirrorless Cameras – Aside from shooting in 4K quality, these cameras usually come with a front-facing camera that conveniently functions as your video monitor.
- Camera Drones – Aerial photography and video have never been more accessible, thanks to camera drones. They add an exhilarating perspective to your videos when shooting outdoors.
- Action Cam – The GoPro is probably the most popular of these and these lend a hands-free perspective to your videos when vlogging on the go or taking on more challenging activities like doing extreme sports and the like.
- Camcorder – Probably still the most versatile and reliable cameras to serve as your main camera.
- Tripod Mounts – A staple for video shoots.
- Gimbal Steady Cam Mount – A pivot mount that allows a camera independent movement from the person handling the gimbal.
- Microphone Setup- Use a combination of the following microphones:
- Lapel Lavalier Mic – Clip-on, hands-free!
- Shotgun Mic – Forward-facing microphones that pick up sound very well when the source is directly in front of them. Use these when you want to ignore the sound that does not emanate from your subject.
- Compressor Mic – Best for studio recording, these mics have the widest frequency recording response and therefore offer superior sound quality.
- Lights Setup- Use a combination of the following lights and accessories:
- Softbox – These emulate natural light and soften harsh white light.
- Umbrella Lights – Used to light an entire scene, these provide a broad source of light if you want to achieve a more balanced shot.
- Ring Light – Makes sure that the subject is perfectly lit. Very useful for those facial closeups vloggers usually do.
- Reflectors – Used to reflect, bounce off, or diffuse light off of a subject. These are usually used to remove shadows caused by other lights used.
- Monolight – compact light units that carry their own power source. Great for shooting on location.
- Editing Machine- Go for something as powerful as the Apple iMac Pro or any computer that has at least a multi-core i7 processor, 32 GB of RAM, 1-2 TB of hard disk space, and a GeForce GTX 1060 – 1070 graphics card, and you are all set.
Setting the Stage
Having a well-lit, pleasant-looking space is all you will ever need as your set. Keep your set simple and avoid too much clutter in your background to not distract the viewers from what you really want to show.
Look Great, Sound Great
Having your set well lit with proper lighting set up and having proper microphones are always key. There is no other secret to looking and sounding great.
Light Setup
Having the basic Three-Point Studio Lighting setup is more than enough to make your YouTube videos look crisp and professional. It is easy to achieve and will not cost you an arm and a leg.
- Key or Main Light – A broad source of light that illuminates the whole room and the subject in a balanced, bright light.
- Fill Light – This light fills in shadows on your subject. These are usually on a lower brightness than the Key Light and softly removes hard shadows in your set.
- Hair Light or Kicker Light – Used to illuminate the finer details of your entire shot. This also highlights a subject to separate and make it distinct from the background.
Step 4: Editing Your Video
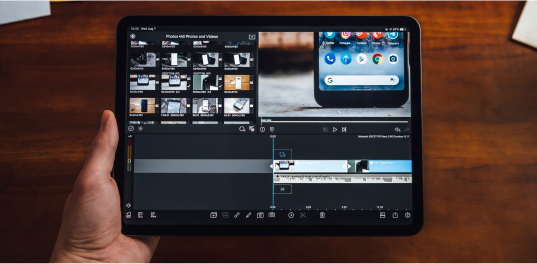
There are several YouTube video editor and YouTube video maker apps online that are available for download: Movavi, Filmora, YouTube Video Editor, and Windows Movie Maker. These are very user-friendly apps that are easy to learn and master. Other more advanced editing software like Edius and Lightworks are available if you want a more varied program that can fulfill your advanced editing demands.
Step 5: Uploading Your YouTube Video
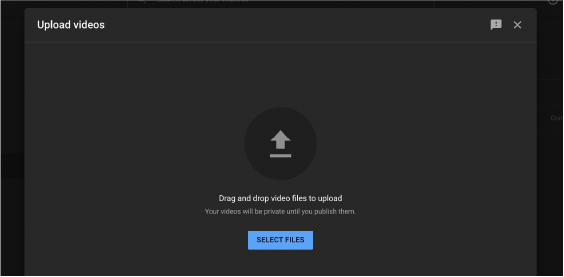
It is time to upload YouTube video content to your channel! Is it your first time uploading? Here is a step-by-step guide in uploading to YouTube.
- Sign in to YouTube using your Google account.
- Create a channel!
- Click on Upload Video, select your video, and publish!
| Recommendation:Delete old YouTube videos, these videos might be irrelevant to your new channel.
Step 6: Optimizing Your Video for YouTube
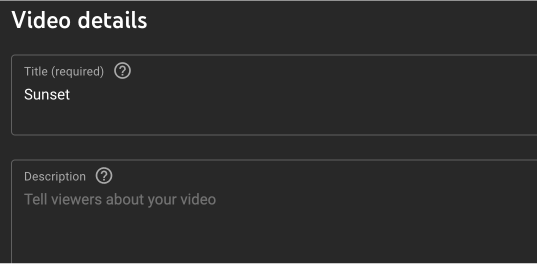
This makes it easy to know what your video is about so people can easily find you. Type in all relevant keywords into the tabs. This way, users can find your video when they type in these keywords in the YouTube search bar. YouTube allots you 500 characters to play with, so use all of them! This is the number one way to tell YouTube what your video is about and to get found by your target viewership. Use these tools that YouTube gives you and you are golden!
| Recommendation: Use these SEO tips to increase visibility to your YouTube channel.
Step 7: Promoting Your Videos

Build a Community Around Your Channel
Engage viewers and make them feel special and included. Listen to them and reply with a sincerity that you give your close friends. Build a well-fostered community and your channel will flourish even outside YouTube.
Use SEO Tools
There are a lot of SEO tools that help identify what YouTube users are looking for. Answer the Public and Uber Suggest are two tools that are easy to use.
A Concise Headline
Use your main keyword at the beginning of your title. Make your title naturally catchy, compelling, and SEO optimized.
An Optimized Description
Because an optimized title is not enough. Add your main keyword and other related keywords in the description.
Contact Marketing Professionals
Get help from services like TubeKarma. Marketing professionals who work specifically with YouTube will give you organic channel growth by garnering your channel thousands of subscribers in a couple of months. But make sure you stay away from unreliable services who use fake followers and can harm you. Read testimonials, test the services and grow your fan base!
Step 8: Follow Through!
It might discourage you that making a video entails a lot of steps but keep at it and you will learn the ropes. After uploading a few YouTube videos, these steps won’t feel so daunting and you will enjoy your time making YouTube videos.
- How to Analyze Your YouTube Analytics Data - March 28, 2023
- How to Monetize Your Social Media Channels? - March 24, 2023
- How to Make a YouTube Channel Searchable - March 6, 2023

